
How to move the applications to sd card in unrooted android devices,it supports 2.0,2.2,2.3
This requires Froyo 2.2 or above
It doesn't void your warranty
It doesn't delete existing apps
It's perfectly safe
It doesn't require rooting.
I realise there are a few threads about this, but I thought I would make a new one for to make easier than any other guide, and hopefully people will find it more easily as they won't have to scroll through pages of other threads to find an answer.
I am now successfully running most apps from my SD Card now. So here is my guide - hope it helps
Download the SDK from here- Android SDK | Android Developers
downloaded exe file should be installed.
Note:
basically installed files only in "C:\Program Files "here you find the android folder.
Copy that Android folder to the desktop.
Open the folder on the desktop and open the file, SDK Manager.exe (as no such file as setup.exe exists in the new version of the SDk)
Close the command or windows command prompt window that opens else automatically closes.
Untick all options you are promted to download except ones like the manuals, and Essentially, ensure the USB driver option is selected or ticked.
Let these files download
Ensure on your phone, USB Debugging is on - Go to Settings/Applications/Development/USB Debugging and ensure its ticked or on.
Download and install HTC Sync from HTC's website for your device.
Connect your phone by USB and select the HTC sync option when it pops up with charge only, disk mode etc.
Allow the sync to complete.
Open windows command promt. Start / Run
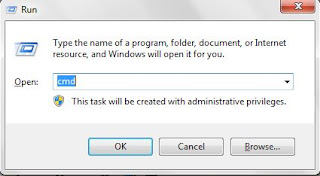
Type in (without quotations) "cmd"
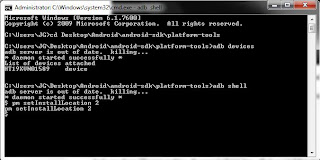
The following should appear. (note its "users" in windows 7, )
15. Type in the following after the ">" at each step (without quotations,and including spaces and capital letters)
"cd desktop\android\android-sdk\platform-tools" (might be "cd desktop\android-sdk-windows\platform-tools" in windows 7)
"adb devices"
"adb shell"
A $ sign should pop up
"pm setInstallLocation 2"
Another $ should pop up
should show like this
And your done. Close everything, disconnect phone, turn off phone and then turn it back on again.
16. Now the phone will be set to install all apps you install onto the SD card. However, current apps on phone will mostly still be stored on the internal memory. This process doesn't move these apps for you, it adds the ability. So you must now manually move those already installed on the phone.
To do this, go to settings / applications / manage applications
Then you just click on an app, and the move to SD card box should no longer be Grey. So you must now move all the apps you want onto the SD Card.
-------------------------------------------------------------------------------------
This requires Froyo 2.2 or above
It doesn't void your warranty
It doesn't delete existing apps
It's perfectly safe
It doesn't require rooting.
I realise there are a few threads about this, but I thought I would make a new one for to make easier than any other guide, and hopefully people will find it more easily as they won't have to scroll through pages of other threads to find an answer.
I am now successfully running most apps from my SD Card now. So here is my guide - hope it helps
Download the SDK from here- Android SDK | Android Developers
downloaded exe file should be installed.
Note:
basically installed files only in "C:\Program Files "here you find the android folder.
Copy that Android folder to the desktop.
Open the folder on the desktop and open the file, SDK Manager.exe (as no such file as setup.exe exists in the new version of the SDk)
Close the command or windows command prompt window that opens else automatically closes.
Untick all options you are promted to download except ones like the manuals, and Essentially, ensure the USB driver option is selected or ticked.
Let these files download
Ensure on your phone, USB Debugging is on - Go to Settings/Applications/Development/USB Debugging and ensure its ticked or on.
Download and install HTC Sync from HTC's website for your device.
Connect your phone by USB and select the HTC sync option when it pops up with charge only, disk mode etc.
Allow the sync to complete.
Open windows command promt. Start / Run

Type in (without quotations) "cmd"
The following should appear. (note its "users" in windows 7, )
15. Type in the following after the ">" at each step (without quotations,and including spaces and capital letters)
"cd desktop\android\android-sdk\platform-tools" (might be "cd desktop\android-sdk-windows\platform-tools" in windows 7)
"adb devices"
"adb shell"
A $ sign should pop up
"pm setInstallLocation 2"
Another $ should pop up
should show like this

And your done. Close everything, disconnect phone, turn off phone and then turn it back on again.
16. Now the phone will be set to install all apps you install onto the SD card. However, current apps on phone will mostly still be stored on the internal memory. This process doesn't move these apps for you, it adds the ability. So you must now manually move those already installed on the phone.
To do this, go to settings / applications / manage applications
Then you just click on an app, and the move to SD card box should no longer be Grey. So you must now move all the apps you want onto the SD Card.
-------------------------------------------------------------------------------------
i need more informations for android htc explorer to expand the memory...
ReplyDeletemail me to mailtomkarun@gmail.com
without rooting this is the way, but by rooting u can expand internal memory.
Deletethat means u can move all the applications to sd card...
here is the link.....
http://how2rootandroiddevices.blogspot.in/2012/04/how-to-root-htc-explorer-tutorial.html
Thumbs up bro!
ReplyDeleteWorks like a charm :)
thankyou for ur intrest on my site..
Deleteur always welcome.....
whenever i instal htc sync in my pc it never detects htc explorer.....so the whole process could not completed...plz help me!
ReplyDeletethnks
Friend you should connect it in charge mode and also to wait to install sync.apk to install in ur phone so that your phone will be viewed...
ReplyDeletei hope its help full...
This comment has been removed by the author.
Deletenow sync problem is fine but when i enter the command of "adb shell" it does not work and instead showing $ sign it shows"sh-3.2#"
ReplyDeletehelp plz
please follow the steps as i mentioned above..
Deleteits working fine for all the vertions above 2.2 or greater....