NAVIGATION BAR

Showing posts with label HOW TO ROOT HTC Rezound. Show all posts

Saturday, June 16, 2012

How To Root HTC RHYME

How To Root HTC RHYME


What you need: - Downloads: HTC Sync (who are not yetaccording to HTC instructions) you need also: Android SDK (who has not yet there) http://developer.android.com/sdk/index.html(android-sdk_r16 windows.zip) Java first Java itselfhttp://java.com/de/ second Java SE Development Kit 7u2http://www.oracle.com/technetwork/ja...d-1377129.html (from the list just select your OS, eg Windows x64) Alternatively, why?HTC wants you here now, the Android SDK downloaded updated with java etc etc blah to 3 specific files then get out to fish:Fastboot.exe AdbWinApi.dll Adb.exe I saw you uploaded the files above, you can save in good times 30min away from the official who, ect with android SDK -wants to> go Have fun ^ ^ ------------------- go: (I will NOT ALL translate from English to German (eg the warnings), please use a translator or someone asks / or here, if ye are not sure) first goes on http://www.htcdev.com/
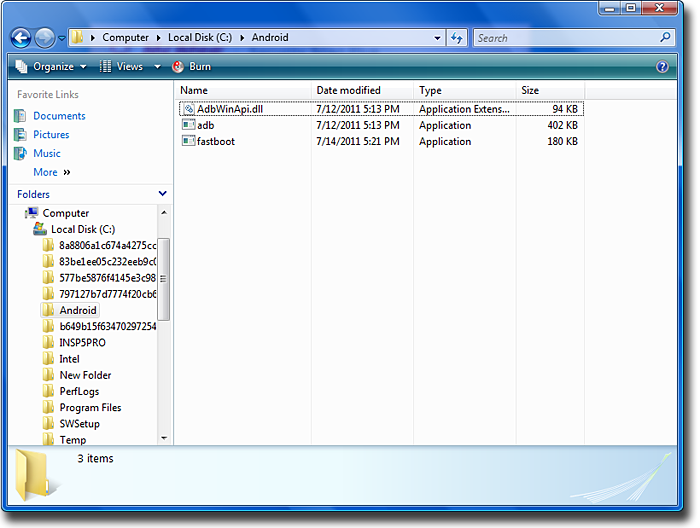
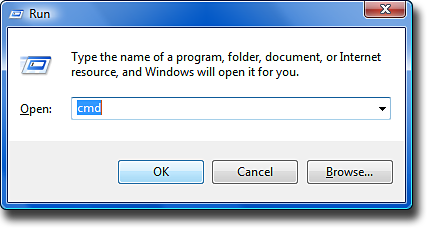
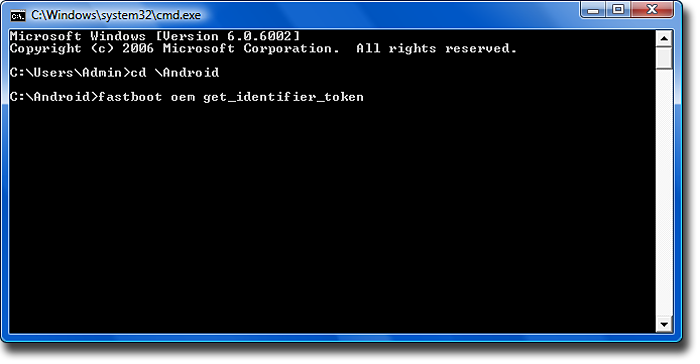
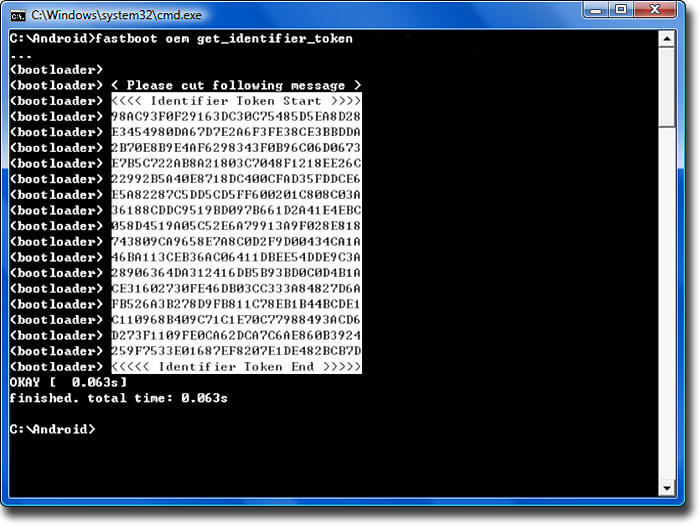
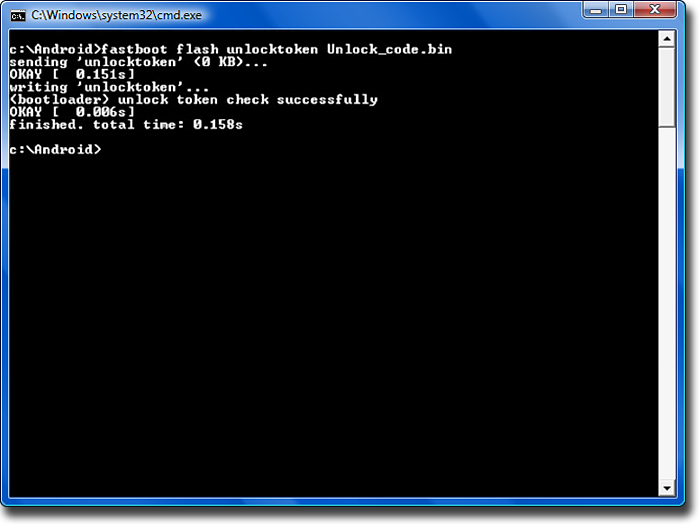
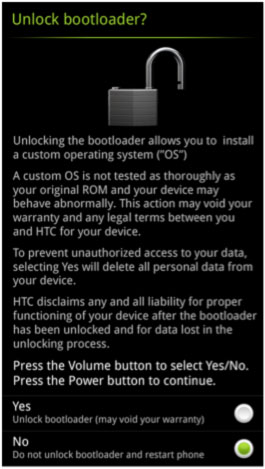
second "Unlock Bootloader" and "Get started" third OF COURSE you read your way through the warnings, loss of warranty, etc!fourth "Begin Unlock Bootloader" fifth Join you there, or you are not signed! 6th Again, read warnings, YES, we go further. 7thAgain, read what you have to confirm with hooks. 8th The manual itself: Step 1: According to HTC now you have to take out the battery and clean again. yes no .... is clear .... ? orSettings-> Power-> Quick start off step 2: Turn off the volume button DOWN to the press is like time on / off power button, to get into the bootloader. step 3: Use the buttons volume up, down to FASTBOOT highlight and confirm this with the on / off power button. Step 4: to Close the Rhyme with the USB cable to the PC. Now it gets funny: Step 5: Create a new folder MOST DIRECTLY TO C: (top directory in your hard drive) with the name "Android" for example C: \ Android DA PURE have the 3 files I've listed above (with Download, extract the zip, of course.)Fastboot.exe AdbWinApi.dll Adb.exe (who is the official way (manual or RNAs of files on Android SDK will go) should, in this step follow the official instructions) Step 6: Now open the "Run" console. For example you can find the windows 7 under Start-> All Programs-> Accessories -> RUN writes there simply pure: cmdand confirm this with OK Step 7: A DOS console opens writes there now follows the same clean: cd c: \ Android (C: \ Android stop THEN, if you have named the folder in step 5 above) when the folder "xyz "is, then writes: cd c: \ xyz Step 8: now writes:fastboot oem get_identifier_token a large text block should now appear ... (If your device is still in the boot loader / fastboot connected via usb is: P) Step 9: Copy of the token-text blockmoves with the mouse into the window, right click on the text-block-> Mark with then the mouse, HAIR EXACTLY the board (see picture ) mark when this is highlighted in white . AGAIN clicks the right mouse button on the selected field , the text block is now copies (as in copy & paste) . this best fits into a txt an editor.ATTENTION; CONSOLE OPEN RUN! Step 10: Is t so now its back on the HTCdev instructions (also as in step 10), sooooo empty field below the "My Device Identifier Token:" insert your token and send it to block "submit" to HTC. now you will get soon , an email from HTC (email address of the registration) , both with a LINK "Click here to continue the boot loader unlocking process."as well as Annex "Unlock_code.bin" Step 11: Download the attachment, and in the folder c: \ Android ( \ Krikkelkrakkeldingsdabums: or c ) file and then click on the link inthe email Step 12: Now go back into the console back writes:fastboot flash unlocktoken Unlock_code.bin Step 13: On your HTC Rhyme you see now a Final Warning with the volume keys you can up and down and confirmed with the ON / OFF power button of course (when read) with "YES". device restarts.Feddisch bootloader .... dead .. your warranty too: P you can now in the first POST I , proceed to step 2 (ZERGRUSH).


Friday, June 15, 2012

HOW TO ROOT HTC ARIA


HTC Aria Rooting Guide


This was orginally posted on XDA-Developers by gtg465x with credit also to eugene373 and attn1:
Prerequisites...

Note: If you're in Linux, you only need to do Step 4, Step 6, and Step 7.

Step 0.
Download and install HTC Sync: http://www.htc.com/us/support/aria-att/downloads/

Step 1.
Download and unzip the Android SDK: http://developer.android.com/sdk/index.html

Step 2.
Go into the folder where you unzipped the Android SDK and open "SDK Setup.exe".
If you aren't greeted with a failed to fetch URL error, proceed to Step 3. If you did receive this error, go to Settings in the "Choose Packages to Install" window and check "Force https;//... sources to be fetched using http://..."
Close and re-open "SDK Setup.exe".

Step 3.
When the "Choose Packages to Install" window pops up, make sure the package "Usb Driver package, revision x" is checked. You can uncheck everything else. Click Install. After it downloads and installs, close "Android SDK and AVD Manager".

Step 4.
With your device unplugged from your computer, go to Settings > Application > Development on your device and turn on USB Debugging.

Step 5.
Now plug your device in to your computer. This is just to make sure the USB drivers are installed.
Once they are installed, unplug your device and turn it off.

Step 6.
This step is optional, but it may prevent an error later on in the process. If you've never formatted your SD card from a computer, remove it from the phone and format it in Windows or OSX with an external card reader. Then place the formatted card back in your phone, but leave the phone off.

Step 7.
Download the updated Root.zip from eugene373's guide: Root the Slide & Other HTC Devices*6/15/2010* How-To Updated 6/29/2010


Now let's get started...

Step 0.
Unzip Root.zip

Step 1.
Place the contents ("update.zip", "ota.zip", and "loop") into the Android SDK tools folder.

Step 2.
Open Command Prompt or Terminal and CD to the SDK tools directory.

Step 3.
Power on your device into the bootloader by holding the "Volume Down" key and simultaneously pressing Power.
Once you're in the bootloader, wait about 30 seconds until some diagnostic checking is done.
Press "Volume Down" to highlight Recovery, but do not push Power to execute just yet.

Step 4.
Now run your loop file from the prompt (either type "loop" in Windows or "./loop.sh" in Linux) (refer to ice3186's post for Mac instructions)
Note: The loop does nothing but show you the connection status of your phone. It's not technically required, but we'll use it in this guide.

Step 5.
Once the loop is running in your prompt, get ready to connect the phone to the computer with the USB cable, but don't connect one end quite yet. With Recovery still highlighted on your phone, you will need to push the Power button and then immediately plug in the other end of the USB cord.

Step 6.
After a few seconds, you should see your device listed in the loop.

Step 7.
Unplug the USB cable from the bottom of your phone and plug it back in. You probably don't need to do this, but let's be safe. Wait for your device to show up in the loop again. Hit CTRL-C to terminate the loop.

Step 8.
You should see a triangle/exclaimation over a phone graphic.
Hold the "Volume Up" key (note it's Volume UP this time) and simultaneously press Power.
After the menu comes up, use the volume and power buttons to select and run update.zip. (This will fail, but we already know that! Select it anyway.)

Step 9.
Paste the following command into your prompt and press Enter.
adb push ota.zip /sdcard/update.zip (*OSX users add a ./ in front of all terminal commands please)

Step 10.
This is very important!! Have this next command ready in your prompt before running update.zip again!!
This is the command. Paste it into your prompt, but DO NOT press Enter yet.
adb push update.zip /sdcard

Step 11.
Run update.zip and as soon as you see a faint progress bar appear behind the text at the bottom of the screen, push Enter to execute the command in your prompt.

Step 12.
If successful, you should see Clockwork Recovery and you now have Su and Superuser.apk installed! You can now reboot your phone into the OS to verify. If unsuccessful, repeat steps 11 and 12.

Step 13.
This step is optional, but it will save you the pain of going through all of these steps again in the future. 
Unrevoked team: Recovery reflash tool (updated - Now for Aria/Liberty!)

Thursday, June 7, 2012

HOW TO ROOT HTC DROID INCREDIBLE

HOW TO ROOT HTC DROID INCREDIBLE


Finding ways to root the HTC Droid Incredible has been a long, hard road but it seems that all great journeys do get happy endings. Thanks to Team unrEVOked, a tool now exists to make the previously painful rooting process fast and painless. The tool, called unrevoked3, has been released for Windows, Mac, and Linux. On top of rooting your HTC Droid Incredible, it also installs ClockworkMod Recovery, so you no longer need to wait to jump on flashing ROMs. This also permanently unlocks the NAND flash on your phone.
Windows users may find their version of the method slightly longer than that of Mac and Linux users, requiring Windows users to install HBoot drivers and to disable HTC Sync, but have no fear. Our guide will walk you through the process. For Mac and Linux users, you can skip ahead to the section on rooting your HTC Droid Incredible using unrevoked3.

Caution

The method described in this guide is compatible with the HTC Droid Incredible only. If your phone is not an HTC Droid Incredible, please do not attempt this rooting method as it may lead to bricking.
Use these instructions at your own risk.  We shall not be responsible for whatever happens to your phone as a result of your use of these instructions.

Requirements

  • HTC Droid Incredible
  • Make sure that USB Debugging has been enabled on your phone. You can do this through Settings > Applications > Development and make sure to click the USB Debugging box.
  • Download unrEVOked3 from the unrEVOked website.  Choose the right package for your computer’s OS.
  • Download the latest unrEVOked forever package (unrevoked-forever.zip, 220 kB).  Rename the file to update.zip after downloading.

Installing HBoot Drivers (Windows Only)

This step is only for Windows users.  Linux and Mac users can skip this.
  1. Download the modified USB driver from here (android-usb-driver.zip, 6.1 MB) to your computer.
  2. Extract the downloaded ZIP file’s contents into a folder on your computer.
  3. Turn off your phone completely.
  4. Boot it into HBOOT by pressing and holding down the Volume Down rocker and the Power key.
  5. On your phone, you should select HBOOT USB on the menu.
  6. Wait until the screen flashes through an “SD Checking” message before pressing anything. Otherwise your phone will ignore any further keypresses.
  7. Connect your phone to your Windows computer with a USB Cable.
  8. Wait for the phone to say HBOOT USB PLUG on the screen.
  9. Open Device Manager on your computer:
    1. Click the Start button in Windows.
    2. Right-click on Computer and then click on Properties.
    3. Click Device Manager.
  10. Under “Other Devices” in Device Manger, you should see “Android 1.0″ listed.
  11. Right-click on “Android 1.0.”
  12. Click Update Driver Software.
  13. Select the option to locate and install driver software manually.  Then, select the folder where you extracted the Android USB driver to.  If you get any warnings, just dismiss them.
  14. After the driver has installed, you can close the Update Driver Software window.
  15. In Device Manager, you should see a new device called “Android Phone”, under which is listed “Android Bootloader Interface.”
  16. Proceed to the next section about rooting.

Rooting your HTC Droid Incredible with unrevoked3

  1. If you’re on Windows, make sure that you uninstall HTC Sync or any other program that might talk to the phone over USB (such as DoubleTwist, etc.) as these will cause problems.
  2. Connect your HTC Droid Incredible to your computer via USB cable.
  3. Drag the notification bar down on your HTC Droid Incredible.
  4. Select “Charge Only” and select “Remember This.”
  5. Run the unrevoked3 program (usually called reflash or reflash.exe) on your computer.  (You may need to extract the executable file first, depending on what OS you’re using on your computer.)
  6. The tool will run its process and provide you with instructions.  Follow the instructions.
  7. Copy update.zip to the /sdcard directory on your phone.
  8. Remove the phone’s battery.
  9. While holding down the Volume Down key on your phone, reinsert the battery.
  10. Use the Volume keys to highlight “RECOVERY” on the menu.  Press the Power button to select it.  Your phone will go into recovery mode.
  11. On the recovery menu, select Apply sdcard:update.zip and confirm that you want to flash the update.
Congratulations! Your HTC Droid Incredible now has root access, an unlocked bootloader, S-OFF, and ClockworkMod Recovery. If Titanium Backup claims that you are not rooted, you can download Busybox from the Google Play Store to fix this.

HOW TO ROOT HTC ONE V

HOW TO ROOT HTC ONE V

The true beauty of an Android phone doesn’t come from its hardware specs, or from the Android version it’s running on. The phone’s genuine beauty comes from the freedom that lets Android users customize their Android phones. For the price of voiding your warranty, rooting your phone will awaken and reveal its true capabilities hiding within its system.
Senior XDA Developers member ckpv5 and a group of developers have created a rooting procedure for your HTC One V. This procedure will easily root your phone and let you gain root-level privileges. With a rooted phone, you can enjoy tweaks and extended features from apps that requires root access. You can even install custom ROMs and other mods to your mobile phone. Continue reading the rest of the guide to learn how to root your HTC One V.

Warning

  • The instructions in this guide are intended for use with the HTC One V. Applying these instructions on another device or model may produce undesired outcomes.
  • The information in this guide is provided for instructional and educational purposes only. There is no guarantee that these instructions will work under your specific and unique circumstances.
  • Use these instructions at your own risk. We shall not hold any responsibility or liability for whatever happens to you or your device arising from your use of the info in this guide.
  • Read and understand the whole guide first before actually performing the instructions.

Requirements

  • An HTC One V with unlocked bootloader.
  • USB drivers for the HTC One V
    • You can get the drivers by installing HTC Sync. Make sure to close HTC Sync before rooting your phone.
  • WinRAR, 7-Zip or other similar file extraction programs installed on your computer.
  • Download the following files:
  • Disable system tools such as HTC Sync, firewall programs, and anti-virus software.
  • Charge your phone’s battery to 60% or more.
  • Backup all personal data on your phone to make sure you have a copy of your personal data (e.g., contacts, SMS, MMS, Internet settings, Wi-Fi passwords, and the like) in case the procedure in this guide erases such data.

Instructions

  1. Download the r1-primo-superboot.zip and extract it to a folder on your computer.
  2. Download the boot.superboot.img and place it in the folder where you extracted r1-primo-superboot.zip. This will replace the boot.superboot.img that came with r1-primo-superboot.zip.
  3. Switch off your HTC One V.
  4. Reboot your HTC One V into Bootloader Mode by pressing the Volume Down key and Power button simultaneously until Bootloader Mode boots.
  5. Select Fastboot from the Bootloader Menu.
  6. Connect your HTC One V to the computer via USB cable. The Bootloader screen should say “FASTBOOT USB.”
  7. Go to the r1-primo-superboot folder and double-click the install-superboot-window.batfile. This will automatically start the rooting process.
  8. Once the rooting process is complete, your HTC One V will automatically reboot.
  9. After complete boot, go to the app drawer. Tap the SuperSU icon and update the SU binary to the latest version.
Congratulations! You have successfully rooted your HTC One V. You can now install apps requiring root access on your mobile phone.

HOW TO ROOT HTC ONE S

HOW TO ROOT HTC ONE S


If you’re in ownership of an HTC One S, you’ll probably be pleased to learn that it’s been rooted courtesy of – as usual – XDA developers, or, more specifically, forum member paulobrien.
We’ve got all the details in a step by step below. Please make sure you read every step carefully in order to prevent any mishaps.
HTC-One-S
DISCLAIMER: Proceed with caution and at your own risk. Redmond Pie is not to be held responsible for any loss of data as a result of you following this tutorial.
Step 1: Download the Superboot .zip file and extract the files therein [Download link over at XDA, with link at the end of the post].
Step 2: Next, you’ll need to ensure your device is in bootloader mode by turning off the phone first, and then powering with the ‘volume down‘ button pressed.
Step 3: Extract the contents of the ‘r3-ville-superboot.zip‘ downloaded in Step 1, and save the folder in a recognized location.
Step 4: Connect your device to your computer via USB cable.
(Mac users, skip to Step 6Linux users, jump ahead to Step 7).
Step 5: Locate the folder containing the extracted files. Double click on the ‘install-superboot-windows.bat‘ file [WINDOWS ONLY].
Step 6: Run the Terminal app on your Mac, making sure that it points to the directory that containing the extracted files. Then, type in the following command:
chmod +x install-superboot-mac.sh ./install-superboot-mac.sh
Step 7: Run the Terminal application on your Linux-powered computer, and again, ensure it is it pointing to the directory containing the extracted files. Type in the following command:
chmod +x install-superboot-linux.sh ./install-superboot-linux.sh
And that – as they say – is that. If you followed the steps religiously, you should now have root access to your HTC One S, with all the freedom and possibilities having a rooted device brings with it!
If you’re unsure of the benefits of rooting your device, or are looking for more information on the subject, I highly recommend you check out this post, which covers many of the pros and limitations of owning a rooted device.
If you get stuck at any point before, during, or after the rooting process, you’re strongly advised to check out the original thread on XDA. They’re a helpful bunch of guys, and very informative, meaning you won’t be stuck for too long.
You can follow us on Twitter, add us to your circle on Google+ or like our Facebook page to keep yourself updated on all the latest from Microsoft, Google, Apple and the web.

HOW TO ROOT HTC Thunderbolt


... How To Root Your Verizon HTC Thunderbolt ...


INFORMATION:
INDEX OF THIS THREAD
Post #1: Revolutionary Toolkit for rooting - You're Here
Post #2: How to root WITHOUT downgrading - Go Here 
Post #3: How to root WITH downgrading - Go Here 
Post #4: How to unroot and return to stock - Go Here


NOTE:
The minor OTA to firmware number 2.11.605.9 patches the exploit used by Revolutionary. 
So, before you can use the Revolutionary Toolkit below... you must either do option #1 or option #2 before using Revolutionary.


There are 2 options:
#1 Achieve temp root via another means, then run Revolutionary. (Info in Post #2)
OR
#2 Several users have reported being able to downgrade to 2.11.605.5 simply by running an RUU for that firmware, despite an s-on hboot wich would normally prevent you from going backwards in version numbers. (Info in Post #3)


Feel free to do whichever is most comfortable  


Revolutionary
A new method has just become available that does not wipe your data. This is 100% the best and most recommended way to root your Thunderbolt at this time.
WARNING: GAINING S-OFF ACCESS ON THE HTC THUNDERBOLT WILL VOID THE WARRANTY.
As with any ROM or modification the usual disclaimer applies.... You are using this at your own risk!


This is, LITERALLY, less than a 5 minute process, assuming you have all the files/preliminary stuff done first. Having to do "all" the preliminary should take you another couple minutes, at most... This is THAT simple!


Information you need to have first:


1) Serial number of your cell phone
2) HBOOT version number
3) HTC FastBoot drivers
4) Super User file: superuser 3.07.zip
-----------------------------------------------------------------------


5) Uninstall HTC Sync drivers (or any other auto-sync programs you may have on your computer; you may just need to turn them "off"; I don't know.)


6) Set phone to USB Debugging on, and Always awake


To get into HBOOT, turn your phone off. Then press the volume down button along with the power button. Press and hold, and within 5 seconds it'll come on. This method supports versions 1.04.0000 and 1.05.0000.


Step-by-step Revolutionary rooting instructions:


Step 1) Install HTC FastBoot driver


Step 2) Go to REVOLUTIONARY and follow the instructions to download the file revolutionary-0.4pre3.zip. It will require you to know your cell phone's serial number, and what version of HBOOT you have.


Step 3) Plug your phone in, select "usb storage", and copy the Super User file to the SDCard somewhere (easiest if you don't put it into a folder on your SD card.) Don't unzip it. 


Step 4) Plug in your phone, and when the prompt comes up, set to "Charge Only". Disregard any notices and don't install any additional drivers or whatnot.


Step 5) Unzip the Revolutionary zip file into a folder somewhere you can find it.


Step 6) Run the file "revolutionary.exe".


Step 7) Follow the prompts on the screen. It's pretty straightforward. It will reboot to HBOOT a couple times, the last time you'll see it at the top saying "S-Off".


Step 8) It asks you if you want to install clockwork recovery. Select "Y". You'll need this...


You now have a permanent custom recovery on your phone.


Now to actually Root it:


Step 9) From the HBOOT, scroll down to "Bootloader" using the volume keys, and select using the power button. Then scroll/select "Recovery" Yes, it seems sluggish...that's fine. Don't be impatient; it'll let you scroll at some point...


Step 10) Wait! You'll see the HTC spash screen for a bit, and then eventually you'll be into Clockwork Recovery


Step 11) Scroll to "install zip from sdcard" and select.


Step 12) Scroll to "choose zip from sdcard"


Step 13) Find the super user file (superuser-3.zip) (it'll be at the bottom of the directory list if you put it in the base directory of the sd card) and select it.


Step 14) Sit back and watch the quick show... If all goes well, it will install and show you when it's finished.


Step 15) Reboot the phone (keep selecting "back" until you have the option to reboot the phone)


If you are getting Force Closes from Superuser after you are finished, please reboot into Clockwork Recovery and FIX PERMISSIONS. 

YOU'RE NOW ROOTED!!! On a STOCK ROM! No loss of data. No re-setup. Nothing... 

Monday, June 4, 2012

How to Root HTC Sensation 4G


How to Root HTC Sensation 4G


If you are using HTC Sensation 4G and want to Root your phone, have fun installing custom ROMS and tweaking your phone the way you want to, this is a simple step by step guide to gain root access to your android HTC Sensation 4G phone.
Rooting HTC Sensation 4G has three main steps which followed properly will ensure you have a rooted phone and you wont be cursing yourself for venturing into the android root world. Steps involved are:
1. S-Off your HTC Sensation
2. Install Recovery
3. Root your HTC Sensation
Before we get started, a couple of things that you need to make sure. The computer that you will be using to perform the root should either be running Windows or Linux, secondly your Sensation needs to be fully charged. Now lets begin with the rooting.
1. S-Off your HTC Sensation:
1. First of all, get the Hboot version for your HTC Sensation.
For that, with your phone turned ON, go to Settings > Power > Fast Reboot and uncheck fast reboot. Alternatively, you can turn off your phone, take out the battery and insert it again. That’s just to make sure your phone isn’t hibernating. Once done, hold the Volume Down button and press Power button, your phone will enter Bootloader/HBOOT. On the screen you will be able to read what your HBOOT version is.
image
2. Visit http://revolutionary.io/ and from there download the the application for your operating system. Disable your antivirus or add the application to exception list as some antiviruses detect. Extract all files to folder.
3. Get the serial number of your phone. For that either go to Settings > About Phone > Phone Identity.
image
4. When you click on download, a small form will open up. Fill it out with your PC operating system, Phone model, HBOOT version and Serial Number. It will generate the beta key so write that down or copy it.
image
5. On your pc, make sure you exit HTC sync. Now switch on your phone (normal home screen) and attach it to your pc and select HTC Sync mode when it asks for USB Connection type. Ignore any warnings on your phones screen that HTC sync not found.
6. Run the Revolutionary application you downloaded. It should detect your phone *Found your Device: HTC Sensation Z710*.
7. It will ask for the beta key you generated on the website, enter it. Make sure you type it correctly as its case sensitive or just copy paste to avoid mistakes.
8. Follow the on screen prompts and wait till your phone is S-Off.
9. Revolutionary will ask you to install Clockwork Recovery now, enter N .
10. Your device is now S-Off.
image
2. Install Clockwork Recovery:
1. Download recovery v5.0.0.8 for the Sensation from here.
2. Attach your phone in data storage mode to your pc and copy the file PG58IMG to your SD cards root folder.
3. Reboot your phone into bootloader/HBOOT screen.
4. On the screen it will ask *Do you want to start the update*.Press volume up for yes and volume down for no.Press volume up.
5. It will start the update and once done , reboot your phone to normal home screen.
6. Open your SD card and delete the PG58IMG file you copied earlier.
7. Cloclwork Recovery is installed on your phone and you can use it to root your phone.

3. Root your HTC Sensation :
1. Download the file su-2.3.6.3-ef-signed.zip from here.
2. Connect your phone to pc in USB data mode, copy the downloaded file in the root folder of your SD card.
3. Reboot your phone in Bootloader mode, from there navigate to Recovery using volume up and volume down and using power button to select.
4. You will enter Clockwork Recovery.
5. Create a Backup by entering Backup and Restore menu.
6. Select *install from zip* and select the -2.3.6.3-ef-signed.zip file.
7. Choose *Yes – install su-2.3.6.3-efgh-signed.zip *.
8. Once done, go back and select Reboot.
9. Your phone is now rooted.
Using the above mentioned method will insure you have a permanently rooted HTC Sensation with S-Off and Clockwork Recovery. If you want to flash custom ROMS, just copy paste the rom zip in your SD Card, create backup of existing rom using clockwork and flash the new custom rom.
So its time you root your HTC Sensation and gain full control over your device! If you find this guide useful, let us know in the comments section.