NAVIGATION BAR

Showing posts with label 2.3.5. Show all posts

Monday, June 4, 2012

How To Root HTC Sensation XL


How To Root HTC Sensation XL


*** unlocking bootloader from HTCDEV site is highly recommended for a permanent root solution***
1. enable usb debugging from settings - applications - development
2. plug phone to pc via usb cable - charge only
3. open extracted zip folder and click runme. thats all. (if experience any daemon hanging problems pls install htc sync and plug in phone so drivers are installed. once done delete htc sync and repeat root procedure)
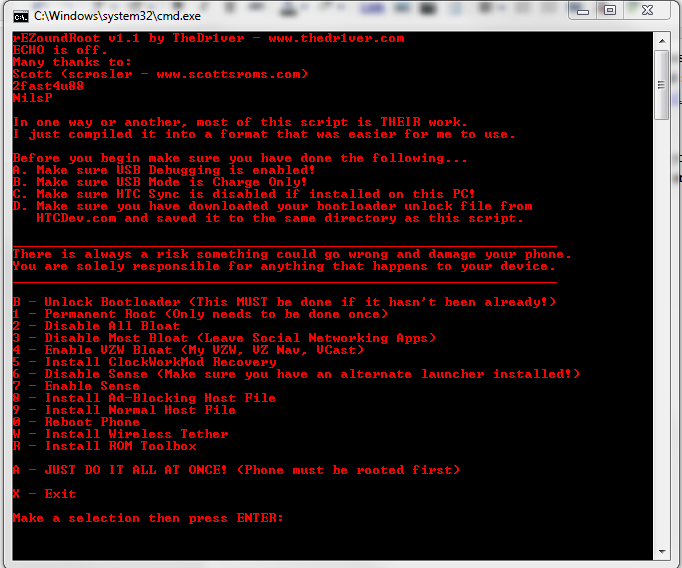
PC will open a cmd screen with prompts that you need to follow. app does rest
4. After root is complete pls visit market and update SU app. once done root will be fully functional and eliminate any future FCs
5. Also as an extra tip you can install SU UPDATE fixer from market to update your binaries to 3.0

ALL DONE
***************** this isnt my work and i take no credit for it. i tried it and the results were good so i am sharing it. period*****************

****please see anzhi thread for clockwork mod and chinese boot.img and rom needed prior to flashing cappy's rcmix3d rom. files needed are posted by me in his rom thread!****

Update:
Software version 1.24.709.2 doesn't seem to be rootable via this method. Please try flashing another ruu from runnymede rom thread then attempt root again

28/3/2012
Added V4 of the Doomlord Exploit as may be why XL was rooted without bootloader being unlocked.

well i relocked my bootloader and flashed ruu 1.05.404 then I used Doolord V4 to root my phone. This was succesful in permanently rooting my phone without unlocking my bootloader. This was not possible with V2 so if anyone wants to root without unlocking bootloader this is now possible using V4 of the Doomlord Exploit attached below. PLEASE NOTE THAT STILL NEED TO UNLOCK BOOTLOADER TO FLASH CUSTOM ROMS AND RECOVERY

Root HTC Sensation XE Having ICS


Root HTC Sensation XE Having ICS

With the introduction of Samsung Galaxy Nexus, he introduced the Ice Cream Sandwich Android 4.0 operating system update that brings several new features and other capabilities. Smartphone from Taiwan manufacturers do not come with a lot of internal memory and you may want to delete some system applications. In addition, you also may want to customize your phone to make it stand out from the crowd. For this you need root access to XE sensation. If you have rooted your phone already, will not be able to get root access after your phone is updated with ice cream sandwiches. Before rooting, you need to open the boot loader that can be done using a step by step method is given in HTC Dev website. Also, your phone must have installed Clockworkmod recovery.
Everyone was happy to have updates on their mobile phone and has now more than three months since the user is waiting for Android 4.0 update. You can not blame the team for such a long wait for Google’s adoption of Android 4.0 and you can not even blame the producers, the rigorous testing that manufacturers get around to deliver bug-free update. Although there is less chance of losing all your data, you should back up all the applications using the File Manager ASTRO. Back up all contacts to the SD card, SMS and call logs on Android on Android. Your phone must have at least 60 percent of the battery.
Android 4.0 update long wait for many devices are now starting to roll with the Samsung Galaxy S II launched the update starting tomorrow. But before that HTC has come out with a quick update for their HTC Sensation Sensation and XE smartphone released today. Updates to the sensation-based HTC smartphone comes along with the introduction of Sense 3.6 user interface. Update as of now is available to users in Germany. Android 4.0 update file for the thrill and sensation of XE is the total size of 283 Mb and we recommend users to go through these updates through the use of Wi Fi connection as if you choose to renew with your data plan it will cost maybe higher speed and Wi Fi download speeds are much better than 3G.
Many users have received a notification on their mobile phone about this update but if you do not accept these changes, so do not worry because you can also update your phone to Android 4.0 and enjoy the best features. If you include those users who have not received the update message then they can go through the Settings> About Phone and then click on software update, finally click Check Now to check whether an update is available on your phone or not.
Steps to Root the HTC Sensation XE on Ice Cream Sandwich:
  1. Download Superuser-3.0.7-d-signed.zip.
  2. Connect your phone to the computer via USB cable and copy the downloaded zip file to the root of your SD card.
  3. Boot into ClockworkMod recovery mode and go to install zip from SD card > choose zip from SD card.
  4. Select the zip file that you copied to your SD card.
  5. Confirm it in the next screen and flash it.
You have successfully rooted your Sensation XE. Sometimes the flashing might not root your phone at once so you may need to repeat it 2-3 times.
Note:
Above mentioned procedure is tested and works perfectly fine, owners should use this procedure at their own risk.
via zenilshroff.com

Incoming search terms:

  • root htc sensation xe
  • root sensation xe
  • sensation xe root
  • download program root sensation
  • easiest way to root htc sensation xe
  • how to root htc sensation xe
  • lensesapp comroot sensation xe
  • htc sensation xe root
  • htc sensation xe ice cream sandwich root
  • root ics htc sensation xe

How to Root HTC Sensation 4G


How to Root HTC Sensation 4G


If you are using HTC Sensation 4G and want to Root your phone, have fun installing custom ROMS and tweaking your phone the way you want to, this is a simple step by step guide to gain root access to your android HTC Sensation 4G phone.
Rooting HTC Sensation 4G has three main steps which followed properly will ensure you have a rooted phone and you wont be cursing yourself for venturing into the android root world. Steps involved are:
1. S-Off your HTC Sensation
2. Install Recovery
3. Root your HTC Sensation
Before we get started, a couple of things that you need to make sure. The computer that you will be using to perform the root should either be running Windows or Linux, secondly your Sensation needs to be fully charged. Now lets begin with the rooting.
1. S-Off your HTC Sensation:
1. First of all, get the Hboot version for your HTC Sensation.
For that, with your phone turned ON, go to Settings > Power > Fast Reboot and uncheck fast reboot. Alternatively, you can turn off your phone, take out the battery and insert it again. That’s just to make sure your phone isn’t hibernating. Once done, hold the Volume Down button and press Power button, your phone will enter Bootloader/HBOOT. On the screen you will be able to read what your HBOOT version is.
image
2. Visit http://revolutionary.io/ and from there download the the application for your operating system. Disable your antivirus or add the application to exception list as some antiviruses detect. Extract all files to folder.
3. Get the serial number of your phone. For that either go to Settings > About Phone > Phone Identity.
image
4. When you click on download, a small form will open up. Fill it out with your PC operating system, Phone model, HBOOT version and Serial Number. It will generate the beta key so write that down or copy it.
image
5. On your pc, make sure you exit HTC sync. Now switch on your phone (normal home screen) and attach it to your pc and select HTC Sync mode when it asks for USB Connection type. Ignore any warnings on your phones screen that HTC sync not found.
6. Run the Revolutionary application you downloaded. It should detect your phone *Found your Device: HTC Sensation Z710*.
7. It will ask for the beta key you generated on the website, enter it. Make sure you type it correctly as its case sensitive or just copy paste to avoid mistakes.
8. Follow the on screen prompts and wait till your phone is S-Off.
9. Revolutionary will ask you to install Clockwork Recovery now, enter N .
10. Your device is now S-Off.
image
2. Install Clockwork Recovery:
1. Download recovery v5.0.0.8 for the Sensation from here.
2. Attach your phone in data storage mode to your pc and copy the file PG58IMG to your SD cards root folder.
3. Reboot your phone into bootloader/HBOOT screen.
4. On the screen it will ask *Do you want to start the update*.Press volume up for yes and volume down for no.Press volume up.
5. It will start the update and once done , reboot your phone to normal home screen.
6. Open your SD card and delete the PG58IMG file you copied earlier.
7. Cloclwork Recovery is installed on your phone and you can use it to root your phone.

3. Root your HTC Sensation :
1. Download the file su-2.3.6.3-ef-signed.zip from here.
2. Connect your phone to pc in USB data mode, copy the downloaded file in the root folder of your SD card.
3. Reboot your phone in Bootloader mode, from there navigate to Recovery using volume up and volume down and using power button to select.
4. You will enter Clockwork Recovery.
5. Create a Backup by entering Backup and Restore menu.
6. Select *install from zip* and select the -2.3.6.3-ef-signed.zip file.
7. Choose *Yes – install su-2.3.6.3-efgh-signed.zip *.
8. Once done, go back and select Reboot.
9. Your phone is now rooted.
Using the above mentioned method will insure you have a permanently rooted HTC Sensation with S-Off and Clockwork Recovery. If you want to flash custom ROMS, just copy paste the rom zip in your SD Card, create backup of existing rom using clockwork and flash the new custom rom.
So its time you root your HTC Sensation and gain full control over your device! If you find this guide useful, let us know in the comments section.

How to Upgrade HTC Evo 4G to Android 4.0.3 ICS Firmware


How to Upgrade HTC Evo 4G to Android 4.0.3 ICS Firmware


It was only a matter of time before Ice Cream Sandwich came to the HTC Evo 4G. Users of this HTC device can now enjoy a taste of Ice Cream Sandwich, thanks to independent developers at the XDA Developers forum.
An alpha version of the Android 4.0.3 firmware was recently released for the HTC Evo 4G, put together by dedicated third-party developers. At the moment, there is no official news when this particular device will receive an official update from HTC, but for those of you who can’t wait to run ICS on your HTC Evo 4G devices, here’s a quick list of what currently works in the firmware.
  • Wi-Fi
  • Bluetooth
  • Audio
  • Carrier service
  • Touchscreen
  • Data Usage Stats
  • GPS
Because this is still developer preview/testing version, there’s no definitive list of what doesn’t work. The developers, however, promised that once a beta is released, they’ll be able to draw a list of what bugs need to be removed.

Requirements

Before you begin applying this update, there are a few things you’ll need to do to facilitate a smooth updating process:
  • Back up all the data currently found on your phone. This will allow you to save your data should it be corrupted or lost during the update process. Do not back up your data with HTC Sync as there is no guarantee that you’ll be able to access HTC Sync after applying this update.
  • Make sure there is at least 70% charge on your HTC Evo 4G’s battery to prevent the phone from shutting down in the middle of the update process
  • Uninstall all antivirus applications present on your computer as they may interrupt the update process
  • Make sure you’ve enabled USB Debugging on your device. You can do this through the path “Settings > Applications > Development > USB Debugging”.

Instructions

Once you’ve completed the installation requirements, you may now proceed to applying the ICS 4.0.3. firmware to your HTC Evo 4G.
  1. Download the Evervolv Acies 2.1.0 preview 1 ROM (based on Android 4.0.3 ICS) package into your computer.  Get the update file here.
  2. Download the Google Apps (gApps) package from here and save it to your computer.
  3. Connect your HTC Evo 4G to your computer with the USB cable.
  4. Copy the ROM and gApp packages into the root of your phone’s SD card.
  5. Disconnect your HTC Evo 4G from your computer.
  6. Turn off your phone and reboot it into bootloader mode by holding down the Volume Down key while pressing the Power Button.
  7. From the bootloader mode menu, select Recovery.
  8. Once in Recovery mode, select “Clear Storage” to delete all the cache data from your phone.
  9. Next select “Install zip from SD Card” from the menu and select the ROM package file you saved to the phone earlier.  Flash the gApps package in the same manner.
  10. After the update files have been flashed, select “++++Go Back++++” to return to the main recovery menu.
  11. Select “Reboot system now” from the menu.
  12. After your phone has rebooted normally, check whether the flashing was successful.  Go to Settings > About Phone > Firmware version to find out whether it says Android 4.0.3.
Congratulations!  You’ve successfully upgraded your HTC Evo 4G to Android 4.0.3 Ice Cream Sandwich via the Evervolv Acies ROM.

Root and ClockworkMod Recovery for HTC Desire S


Root and ClockworkMod Recovery for HTC Desire S on HBOOT version 2.00.0002 even with S-ON


The HTC Desire S was a direct upgrade to its predecessor, the HTC Desire, with twice the RAM, a secondary camera, and a whole bunch of other new features.  With every official update there always comes a price, and for rooted Desire S owners, it could be a nightmare.
Updating to official firmware releases can be a great source of new features and functionality, however it could also make your phone lose root access in the process.  If you’re running an HTC Desire S with HBOOT version 2.00.0002, then you don’t have anything to worry about. Continue reading the rest of this guide as we teach you how you can root your HTC Desire S with HBOOT version 2.00.0002.

Warning

Rooting your device can void your warranty. We will not be held liable if anything should happen to your device. Proceed at your own risk.

Requirements

  • HTC Desire S with unlocked bootloader.  Follow the official instructions for unlocking the bootloader at HTCDev.com.
  • A Windows PC
  • Software for extracting RAR archives (e.g., WinRAR, 7-Zip)
  • Disable Fastboot on your HTC Desire S. You can do this by heading to Settings > Power > Fastboot.
  • Enable USB Debugging on your device. You can do this by heading to Settings > Applications > Development > USB Debugging. Make sure that there is a check mark beside that option.
  • Install the HTC drivers for your phone.  You can do this by installing HTC Sync.
  • Disable or uninstall HTC Sync on your PC. This is to ensure that it doesn’t interfere with the process.
  • Ensure that a microSD card is inserted into its slot on your phone.

Instructions

  1. Download SuperOneClick 2.2 from here (SuperOneClickv2.2-ShortFuse.zip, 1.83 MB) and save the ZIP file to your computer.
  2. Extract the ZIP file’s contents into a folder on your computer.
  3. Connect your phone to your PC via USB cable.
  4. When your phone prompts you for a connection type, choose “Charge only.”
  5. Open the extraction folder.
  6. Right-click on SuperOneClick.exe and choose to run the program as Administrator.
  7. In SuperOneClick, select “AUTO” from the drop-down list for exploit.
  8. Click the Root button and wait for the process to complete.
  9. Download adb-fastboot-win.rar (6.6 MB) and extract the contents into a folder on your computer.  Make sure the files are inside the extraction folder, not inside a subfolder.
  10. Download ClockworkMod Recovery for the HTC Desire S (cwm-4.0.1.4-saga.img, 4.2 MB).  Rename the file to recovery.img.  Copy the file into the same folder where you extracted the ADB and Fastboot files to.
  11. Unplug your phone from your PC.
  12. Switch the phone off completely.
  13. Hold down the Volume Down key and press the Power key.  This will bring the phone to the HBOOT screen.
  14. Connect your phone to the PC via USB cable.
  15. On your phone, press the Power button once to bring the phone into Fastboot USB mode.
  16. Open the folder where you extracted the ADB and Fastboot files to.  Double-click oncommandprompt.bat to open a command prompt from inside the folder.
  17. At the command prompt, type fastboot flash recovery recovery.img and press the Enter key.
  18. Reboot the phone.
Congratulations! You have successfully rooted your HTC Desire S on HBOOT version 2.00.0002 and installed ClockworkMod Recovery.

Rooting HTC Sensation with HTC Super Tool v3


Rooting HTC Sensation with HTC Super Tool v3


Now you can root, S-off and unlock the bootloader of almost any HTC device  like HTC Sensation, Evo Design 4g, Evo 4g, Evo 3d, Evo Shift, G2, MT3Gs, MT4G, MT4Gs,  Inspire, Sensation, Incredible, Wildfire S and Amaze with the help of the application called HTC SUPER TOOL V3 created by FRIGID of XDA Developers Forum. Frigid said that it should also work on any HTC devices because they all have similar architecture.
Just follow this instructions below on how to Root, S-off and Unlock the bootloader of your HTC device.
Note: 
  • Make sure that your device battery is charge atleast 60%
  • Backup your phone data into your computer.
  • Turn on USB Debugging, on your homescreen tap Menu> Settings> Application> Development. Then, make sure that USB debugging is checked.                                         


Requirements:
  • HTC Phone
  • Computer
  • USB Data Cable
  1. First, download and install HTC DRIVER.
  2. Then, Download Super tool v3.
  3. Next,  extract it to a new folder via Winzip/Winrar.     
  4. After that connect your phone to the computer using your USB Data Cable.
  5. Go to the extracted files and doucle click SUPER TOOL to run the program.
  6. Next, you will see a menu like the image below, choose any procedure you want like rooting, unlock bootloader, attempt S-Off etc.
  7. Congratulation you have now Root, unlock bootloader and S-Off your HTC device.

Resources:

HOW TO ROOT HTC Rezound


HOW TO ROOT HTC Rezound


Video tutorial


I've spent pretty much all day on this and wanted to get it out as soon as possible. There have been a lot of scripts floating around there that have a lot of great features, but not one that single-handedly did everything I wanted for my specific Rezound. Therefore, I've developed rEZoundRoot to help make the Rezound rooting process a little easier.

All you have to do is download the .zip file and extract it to somewhere on your hard drive. Then, copy your unique Unlock_code.bin that you obtained previously into the /tools/ folder and run the script. Follow the instructions and you're good to go!


UPDATE 1/4/2011: Fixed some typos, changed the recovery to install Amon Ra instead of Clockwork Mod, and fixed an issue where adb did not wait for the device before pushing ZergRush... Sorry for those who were having issues with getting root from the script.

UPDATE 1/31/2012: Actually added the Amon Ra recovery.img to the package. Previously had overlooked this and it was still installing the old version of Clockwork Mod.

UPDATE 3/5/2012: Updated to version 1.5 in order to reflect the most recent rooting process. Got rid of the Zerg Rush method because it's pretty much irrelevant now. Allows for either temp or perm pushing of Amon Ra recovery, which allows for the pushing of Superuser and SU per the provided instructions. Eventually I'd like to include the stock RUU in order to get those of us who didn't grab the OTA download all set up, but for right now I'm leaving it out to cut down on size. As always, leave questions in the comments. By the way... In case you haven't noticed by now, the text in the screenshot is red. The text in the actual program is blue. I'm not color blind, I'm just too lazy to update the screenshot... But you already knew that, didn't you?

Root Micromax A85 Superfone

Root Micromax A85 Superfone


Micromax A75 is one of cheapest Android Phones. Due to Micromax branding, phone has done good in terms of sales, Thanks to brand awareness of Micromax and their marketing. It is lighter version of Micromax A85 Superfone, and both the phones are not known for high level performance. It is having tough competition from Samsung Galaxy Y, but those who purchase these phones are not satisfied with them at all. The most common reason is these phones can’t be rooted, and there are only few custom ROMs being developed.


Other disappointing point for advanced users was that they are unavailable to root these phones. But, now it is no longer impossible task. Since, an Android Developer, Ninad Chaudhary has developed the ways to root these both phones. Obviously, steps are tricky, and you need technical knowledge to apply this process. In due course of this article, we are going to show you how you can root Micromax Superfone A85 and Micromax Superfone A75 Android phones. We have tried to simply process for you, to make it easy to root your Micromax Devices, in two different sections, based on A75 or A85 Phone models.
Disclaimer: Rooting your Micromax Superfone A85 or A75 would void warranty. There is risk involved in this process, as your device can get bricked, damaged, or even can stop working after trying to root. This tutorial article is meant for educational purpose more, and doesn’t offers any warranty or liability against each step. We or developer should not be held responsible if anything happens wrong with your device, after following the steps, you should try the steps at your own responsibility. Though, we have not got chance to test this phones personally, so you should take care before rooting these phones.
Pre-Requisite
  • Download Latest Micromax Drivers installed in your PC, and also ensure that you have Data Cable available to enable connectivity of phone with your PC.
  • You need to make sure that your Micromax Phone have battery charge at least 70% before starting the rooting process.
  • Backup all the data, including SMS, Data, Call Logs, Contacts, APN and MMS Settings, and everything else, as this method would wipe all the data from the phone.
  • Disable Firewall or Antivirus Apps in your device, to eliminate the conflict.
  • Enable the USB Debugging Mode in your phone, navigate to “Settings > Applications > Development > USB debugging”. You have to disconnect the phone from computer to turn on the USB debugging mode. As per developer’s suggestion, you can install ADB Drivers from other sources, if device drivers are not available.

Part 1: How to Root Micromax A85 Superfone on Android 2.3.4

Step 1: You need to download Micromax A85 Rooting Package and extract it in you PC. Download Link.
Step 2: After downloading the file, open the archive and find the file named boot.img’ from the 2.3.4 upgrade package to the ‘new-boot.img, ensure to remove the original file before replacing.
Step 3: Flash the phone with provided boot.
Step 4: Connect the Micromax Device to Computer. Ensure that it is connected successfully in Device Manager of your PC.
Step 4: After connecting the device, open the directory of extracted package, and find and run the file ‘run_me.bat’..
Step 5: Your phone has successfully rooted, and you have installed BUSYBOX.
If you have faced any problem while installing or trying to Root the device with above mentioned steps, you should consult with developer here.

Part 2: How to Root Micromax A75 Superfone Lite

Developer Ninad Chaudhary has done awesome Job, he has finally developed method of Rooting Micromax A75. The same root can be applied for Fly IQ270. As you might aware, this phone was not rooted by anyone else, but now it is possible with this tricky tutorial. All you need to follow the steps carefully.
Step 1: You need to Download ROOT4.7z
Step 2: Check the system.img extracted file for checksum using HASH TAB.
for SHA512
FEFB2F46622F0F5B0166F8B1696DB0A6E82E98CC05F43D3005 C9C2493B1BB92D3F363E83E883E7956BDBD495C6AC9EF43A5F DFB5F703F5566D39BA772745C002
for Whirlpool
C0C3F3954C5514A0FC4AE4A60FBA1C38AFB97B82064CECDB3D 0C513AD8F13CDA70310DA024D53A8CB4FC3F5D7BC40479EF67 CF3AF3D180F9DC31ADFB621C877A
Step 3: Now, you need to replace the System.img from the update package, which you have downloaded. For yoru comfort, here are those instructions:
  • You need to download three files. Flash Files | SP flash tool | Drivers
  • Install the drivers you downloaded, and then restart the device to complete the drivers installation.
  • Now, run Flash Tool (Downloaded in Step 1), and then select scatter file ‘MT6573_Android_scatter.txt, and in ‘Downloading Agent’ select MTK_AllInOne_DA.bin. Ensure to uncheck the Preloader option.
  • Now, run the Download. If 404 Not Found Error is coming, simply select files one by one, which includes DSP_BL, UBOOT and few more.
  • When interface asks the phone to connect to the PC, then simply turn off the phone and now plugin. In the few minutes, your phone is flashed.
Step 4: Then flash the device, using instructions in update. After doing this, you need to restart your Micromax A75 Superfone lite.
Step 5: Your device has been rooted. But it is reported that the phone users had faced Wi-Fi connectivity issues after installing this Root. Firstly you should try to Reset the IP. If nothing works, then simply do the following:
  • Download Wi-Fi Fix Patch, which would fix permissions as well. If USB Debugging mode is enabled, connect the phone to PC.
  • Find the file. ‘run_me.bat’ from the package, and run the same file, which will Install Busybox and also will fix Wi-Fi issues in your phone.
If you face any difficulty or problem while using this procedure, you can ask directly to developer.

Sunday, June 3, 2012

Rooting Micromax A60

Rooting Micromax A60


Rooting Process
__________________________________________________ __________________________________________________ ___________________________

to root the phone-

use Universal Androot and its soo easy-download it from here-Universal Androot

1.download the apk file
2.use root explorer already installed on the device,and install the universalandroot 
3.and then simply click root and.... bingo u are done with it ..

the phone has no force closes due to this and u can anytime unroot the device using universalandroot...so dont worry about it

__________________________________________________ __________________________________________________ ___________________________
Battery Life
__________________________________________________ __________________________________________________ ___________________________

to increase the battery life do the following

1.download set cpu
-either buy it from market or get it from other source(google it people)
2.root the phone if you haven't done it already
3.start set cpu and goto profiles tab 
4.select enable profiles
5.click on add profile
a)click charging ac/full-600 max and 600 min
b)charging usb/full -600 max and 600 min
c)charging /full-480 max and 480 min
d)temp>50C-480 max and 122 min
e)screen off-122 max and 122 min
f)battery <31% -245 max and 122 min

6.Word of advice is to -a)turn off auto sync 
b)use only a single home replacement app,f you are using multiple like launcher pro ,adw with the 
default launcher,then use home manager(free from market)and then kill the other 
running home launchers
c)and also use a very light on resources home screen setup,like the one that i use(the launcher is 
launcher pro)(the screenshots in the attachment)


__________________________________________________ __________________________________________________ ___________________________
Tools & Bootanimations
__________________________________________________ __________________________________________________ ___________________________


1.USB driver-Find It Here

2.Flashing tools for a60 (for flashing the recovery and other files ) -Click here

thanks amansingh6940 for those reuploads 


3.Android theme editor -Get it here

PS-tutorial for using the theme editor-Tutorial Here

thanks to prateek.maac for this share 

4.Bootanimation thread -Get it here

thanks to rushank2112 for the creation of the thread 

5.Micromax a60 Hardware information thread -Get it here

thanks to harpayara for the creation of the thread 

6.SuperPhone Bootanimation -Get it here

thanks to amansingh6940 
__________________________________________________ __________________________________________________ ___________________________
Tutorials
__________________________________________________ __________________________________________________ ___________________________

0.Complete a60 Noob Guide for everything custom-The a60 noob guide

thanks lucky Dogra for his efforts

A.How to access the Recovery Console-Recovery Console-How to access

thanks manju991 for this one

B.How to manage with limited memory-Manage with Limited memory

C.How to install apps on your sd card(this not exactly installing them on sd rather making a symbolic link on the sd card)

STEPS

1.Download the file from here-Download Links2sd

2.Install the app

3.Download the partitioning tool from here-Minitool Partitioning Wizard

4.Install the above software on your computer

5.Now connect the phone via usb to your computer and mount it

6.Start the partition wizard application on your computer

7.Select the mounted drive

8.Right click on the device and select resize

9.Resize your sd card to a suitable limit and leave some unallocated free space

10.Now select that unallocated space and right click and selct modify

11.Now select the format option of ext3 from the drop down list

12.Now come to the home window of the software and on the bottom left side you have an option called apply the pending changes,select that.

13.After the changes have been applied exit the application and then dismount the drive 

14.Power off the phone and then remove the sd card once and then reinsert it again and restart he phone

15.Once you are done with that,start the application link2sd and then you are ready to go....link the application you see to you allocated ext2 partition 

~CAUTION!!!!~

1.do not link any system app
2.don't link widgets and home launchers like launcher pro or adw
3.and don't link any antivirus app...

"go on enjoy freeing up space in the internal memory"


D.How to Flash Stock Rom Dump

Link here

STEPS
1.First of all download the recovery image I posted and extract it in the root of your SD card.
2.Rename the image to "recovery-backup.img".
3.Download "Recovery flasher"-Recovery Flasher
4.Install and start it,then press "Restore Backup image" button.


credits to fonehacker for this


E.Tutorial for changing the font color of Clock and Notifications in Statusbar-See it here

thanks to rushank12 for his efforts


F.Customize your android phone COMPLETELY-Customization Tutorial

Credits to borax12 for the tutorial 


G.How to install Custom Recovery-Custom Recovery installation tutorial easy way

Credits to kjain9878 for the tutorial 


H.How to remove Netlock Code-Remove NetLock Code problem with some custom roms

Credits to H M Judge for the tutorial 


I.How to solve APN problem in Froyo for a60-Remove APN problem occurring in some froyo based roms

Credits to Lucky Dogra for the tutorial 


J.The battery saving guide for a60-Battery saving tips for android phones

Credits to H M Judge for the guide

__________________________________________________ __________________________________________________ ___________________________
Rom Dumps
__________________________________________________ __________________________________________________ ___________________________


Complete rom dump

1.Link1

this is a complete rom dump with the system partitions,using rom dump from here-Rom Dump tool from Android podtwo

2.Link2 (Newer)

3.Another link if above two dont work -Click Here

PS

How to flash it

to flash the second rom dump use the steps given in the document uploaded in this post-Steps to flash the Rom dump


credits to rudie_techie,and ngage_me for their efforts

__________________________________________________ __________________________________________________ ___________________________
Custom Recovery
__________________________________________________ __________________________________________________ ___________________________


Final tested version -clockwork recovery(display issue fixed)

This is the one you need to download-Final Clockwork recovery

:Old:
The custom recovery thread

Click Here

a big thanks to drellisdee for his efforts 


2.Clockwork mod recovery v5 -LATEST

Latest CWM v5 recovery for a60

a big thanks to ngage_me for his efforts 
__________________________________________________ __________________________________________________ ___________________________
MODS and APPS
__________________________________________________ __________________________________________________ ___________________________


1.Reboot Menu to Power Menu: -

Click Here

thanks to svprm for this great share 


2.To use gtalk on your phone -Find Out here

thanks krishna for this great find 


3.Phone Video Recording upgrade to 640*480 at 29fps -click here

thanks harpayara for this great effort 

4.Phone Video Recording upgrade 2 -click here

thanks harpayara for this great effort

5.Chrome browser mod+miren browser -click here

thanks varun.chitre15 for this great effort 

6.Adobe Flash Player 11 for a60 -click here

thanks harpayara for this great effort 

__________________________________________________ __________________________________________________ ___________________________
Custom Roms
__________________________________________________ __________________________________________________ ___________________________

~~IMPORTANT~~

How to Install Custom Rom -Click Here for the instructions 

Thanks to andro.king for the effort to write the document 


ROM List


1.Final Froyo Port -(from n720 zte phone rom dump)(Everything working) -Final Froyo Port-Stable

(credits to samrox,santodelaespada(for the rom dump of n720 FROYO),Varun ,Preet,ngage_me & the entire A60 FROYO TEAM

PS- Well if anybody is interested in just getting the zte rom dump(this is not a rom to flash ,this is only if you want to develop a rom off this one ,then this link is for you )

Zte Rom Dump

~Credits to santodelaespada for providing us with this ~

2.Another Froyo working port -Froyo Port -working 

credits to kjain9878 and sam 

3.First Froyo Port(partially working)-Click here 

thanks to varun for taking the pains to port the froyo rom over to a60

4.Jet Rom

Jet ROM 2.1 -Froyo Rom with the best benchmark scores

IMP- GPS fix for Jet 2.1- Click Here

JET ROM 1.0 

Jet 1.2


Thanks to varun.chitre15 for developing this rom 


5.Cyanogen Mod 7 port -not fully working-Cyanogen mod 7 port 

thanks to fonehackezhs for making it 


6.Eclair Rom-Rom by svprm

thanks a ton to svprm for the wonderful effort

7.MIUI forked RomNot fully working -Link for the MIUI based rom

credits to maniacscorpio 

8.The Sense Rom-Sense Rom 

credits to 1lshara

PS-bugs at the moment-cannot authorize the application requiring account authorization(the onles including redirection to account verification pages in the browser)cause force close of the browser.credits to 1Ishara for finding this out

UPDATED -Sense With WP7 style


9.Cyanogen Mod 7 Port-Cm7 

credits to sam,varun & rohan & kjain9878 

PS-bugs at the moment-


10.Kul rom- Get it here*

credits to H M Judge 


11.SpeedY RoM Version 1- Get it here*

credits to bhanu423 

12.Freeks Rom Version 1- Get it here*

credits to Rohan Arya 

13.Freeks Rom Version 2- Get it here*

credits to Rohan Arya 
__________________________________________________ __________________________________________________ ___________________________
Themes
__________________________________________________ __________________________________________________ ___________________________

0.Xperia Theme for Froyo for a60Get It here

thanks to varun for his efforts

1.Colored settings themeGet It here

thanks to rushank for his efforts

2.BX density theme-Get it here

thanks to by takshak for his efforts

3.Complete Black theme

Get it here

thanks to svprm for this great share 

4.Sony Xperia Theme for a60
Sony Xperia Theme for a60

Thanks to varun for making it 


5.New themes for andro a60
New Themes

thanks to prateek.maac for this share 

6.The Custom Droid theme for a60
Click here to get it 

thanks to deep@androidxda for the efforts 

7.Dark Purity theme for a60
Click here to get it 

thanks to deep@androidxda for the efforts 

8.'Androidian' theme for a60
Click here

thanks to himsin for the efforts 

9. ICECREAM SANDWICH THEME v v1
Click here

thanks to varun.chitre15 for the efforts

10. Ambiance Theme for a60
Click here

thanks to rushank2112 for the efforts
__________________________________________________ __________________________________________________ ___________________________ 
About Borax12 & TechTurning 
__________________________________________________ __________________________________________________ ___________________________

TechTurning has a Website!!-TechTurning-Keep Imbibing the geek Culture

Our Youtube Channel-We're on Youtube

Borax12's Twitter page-Follow me

TechTurnings on Facebook Too !!--TechTurning on FB

Borax12's an Artist -Borax12's portfolio

Borax12' Often Shares his Source code too,btw hes an android Developer too-Borax12's Github

Attached Thumbnails
Click image for larger version

Name: CAP201101191849.jpg
Views: 2159
Size: 67.5 KB
ID: 493958   Click image for larger version

Name: CAP201101191850.jpg
Views: 1739
Size: 61.8 KB
ID: 493959   Click image for larger version

Name: CAP201101191857.jpg
Views: 1643
Size: 56.4 KB
ID: 493960